Thứ Sáu, 17 tháng 7, 2015
Thứ Hai, 11 tháng 5, 2015
Thứ Hai, 4 tháng 5, 2015
Thứ Bảy, 18 tháng 4, 2015
Kiến trúc Khách sạn: Đề cương Đồ án Khách sạn 300 giường
Kiến trúc Khách sạn: Đề cương Đồ án Khách sạn 300 giường: BỘ GIÁO DỤC VÀ ĐÀO TẠO CỘNG HOÀ XÃ HỘI CHỦ NGHĨA VIỆT NAM TRƯỜNG ĐẠI HỌC DUY TÂN Độc lập - Tự do - ...
Thứ Sáu, 17 tháng 4, 2015
Thứ Năm, 16 tháng 4, 2015
Thứ Tư, 15 tháng 4, 2015
Thứ Hai, 13 tháng 4, 2015
Cứ gọi tôi là Đích Ken: Blend màu sử dụng Apply Image và Knoll Light Facto...
Cứ gọi tôi là Đích Ken: Blend màu sử dụng Apply Image và Knoll Light Facto...: Chào các bạn hôm nay mình gửi tới các bạn phương pháp blend màu không mới mẻ nhưng nhiều bạn không biết đấy. Đó là sử dụng Apply Image để xử...
Cứ gọi tôi là Đích Ken: Blend màu Vintage nâu
Cứ gọi tôi là Đích Ken: Blend màu Vintage nâu: Hôm nay mình gửi tới các bạn một tut blend màu khá nhiều bạn thích, không phải bây giờ mà nó đã từ có rất lâu ùi. Các bạn xem và ủng hộ mình...
Cứ gọi tôi là Đích Ken: Blend màu vàng + sử dụng FLOOD
Cứ gọi tôi là Đích Ken: Blend màu vàng + sử dụng FLOOD: Lâu rồi không viết tut gửi tới các bạn. Một phần là lười và cũng một phần do công việc. Hôm nay gửi tới các bạn cách sử dụng plugin "FL...
Cứ gọi tôi là Đích Ken: Blend màu nâu đỏ - Phần 2
Cứ gọi tôi là Đích Ken: Blend màu nâu đỏ - Phần 2: Chào các bạn, hôm nay mình gửi tới các bạn một hướng dẫn blend màu khá là hay. Do xu thế hiện nay mọi người sử dụng Camera Raw hay LightRoom...
emersonArts: VraySun e VraySky (VraySky) - 4
emersonArts: VraySun e VraySky (VraySky) - 4: Veja Também: VraySun e VraySky (VraySun) - 1 VraySun e VraySky (VraySun) - 2 VraySun e Vr...
emersonArts: VraySun e VraySky (VraySky) - 3
emersonArts: VraySun e VraySky (VraySky) - 3: Aqui vou mostrar mais especificamente sobre o VraySky. Veja Também: VraySun e VraySky (VraySun) - 1...
emersonArts: VraySun e VraySky (VraySun) - 2
emersonArts: VraySun e VraySky (VraySun) - 2: Veja Também: VraySun e VraySky (VraySun) - 1 VraySun e VraySky (VraySky) - 3 VraySun e...
emersonArts: VraySun e VraySky (VraySun) - 1
emersonArts: VraySun e VraySky (VraySun) - 1: Oi! Neste tutorial irei mostrar os parâmetros da luz VraySun (simula a iluminação solar) e VraySky (simula a iluminação e aparênc...
Thứ Bảy, 11 tháng 4, 2015
Thứ Sáu, 10 tháng 4, 2015
Thứ Tư, 8 tháng 4, 2015
PHAM THANH HAT: VRay The Complete Guide Full Complete 2008 & 2010 ...
PHAM THANH HAT: VRay The Complete Guide Full Complete 2008 & 2010 ...: Francesco Legrenzi - VRay The Complete Guide Full Complete 2008 & 2010 (1nd + 2nd) FS & FSn Link | .pdf | DVD | original | 1.36 G...
Thứ Ba, 7 tháng 4, 2015
PHAM THANH HAT: VRay The Complete Guide Full Complete 2008
PHAM THANH HAT: VRay The Complete Guide Full Complete 2008: Francesco Legrenzi - VRay The Complete Guide Full Complete 2008
Chủ Nhật, 5 tháng 4, 2015
Thứ Bảy, 4 tháng 4, 2015
Thứ Tư, 1 tháng 4, 2015
Thứ Tư, 25 tháng 3, 2015
Ròm triển lãm Hình Ảnh , Giải Trí & ....- Lầu 3: đồng chí “Ni – cô – lai nhai quai dép”; đồng chí “...
Ròm triển lãm Hình Ảnh , Giải Trí & ....- Lầu 3: đồng chí “Ni – cô – lai nhai quai dép”; đồng chí “...: Phiên âm đỉnh cao tiếng việt - Nhận lời mời của Chủ tịch QH Nguyễn Sinh Hùng, Ðoàn đại biểu QH Vương quốc Thái-lan do Ngài S...
Nam Ròm: Hình xưa những gánh hàng rong bên lề đường Sài Gòn...
Nam Ròm: Hình xưa những gánh hàng rong bên lề đường Sài Gòn...: Tay trắng tay đen chè đậu đen nước đường cát trắng ..... Nhớ món chè đậu đen đập nước đá bỏ vô ....hổng biết nay còn có ai ăn kiểu này kh...
Nam Ròm: Cà phê Sài Gòn xưa
Nam Ròm: Cà phê Sài Gòn xưa: Cà phê Sài Gòn xưa Cà phê Sài Gòn Xưa & Nay B ạn đã uống cà phê nhiều, bạn...
History II of Interior Design: Arts
History II of Interior Design: Arts: This period in history took place between 1860 - 1910. It started in England by William Morris and was the reaction to the Victorian Period...
Thứ Ba, 24 tháng 3, 2015
Thứ Hai, 23 tháng 3, 2015
Đào tạo 3d max Vray - Sketchup - Rhino - Mega3d.vn tại HCM - Ths.KTS Nguyên Vũ 0905 466 238: 30. Ý NGHĨA CÁC THÔNG SỐ TRONG VẬT LIỆU VRAY 2.0 -...
Đào tạo 3d max Vray - Sketchup - Rhino - Mega3d.vn tại HCM - Ths.KTS Nguyên Vũ 0905 466 238: 30. Ý NGHĨA CÁC THÔNG SỐ TRONG VẬT LIỆU VRAY 2.0 -...: Diffuse Diffuse Đây là màu sắc của bề mặt vật thể, phản xạ và khúc xạ màu sắc có thể ảnh hưởng đến sự xuất hiện hình ảnh của màu sắc này. Đ...
Đào tạo 3d max Vray - Sketchup - Rhino - Mega3d.vn tại HCM - Ths.KTS Nguyên Vũ 0905 466 238: 1. TẤT TẦN TẬT VỀ THÔNG SỐ VRAY PHYSICAL CAMERA / ...
Đào tạo 3d max Vray - Sketchup - Rhino - Mega3d.vn tại HCM - Ths.KTS Nguyên Vũ 0905 466 238: 1. TẤT TẦN TẬT VỀ THÔNG SỐ VRAY PHYSICAL CAMERA / ...: Vray Physical Camera được mô phỏng như một chiếc máy ảnh DSLR chuyên nghiệp. DSLR nghĩa là: Digital Single Lens Reflex Camera, tạm dịch Máy ...
Đào tạo 3d max Vray - Sketchup - Rhino - Mega3d.vn tại HCM - Ths.KTS Nguyên Vũ 0905 466 238: 20. TUT VẼ ĐÔN GHẾ TRONG 5' / Học 3DSMAX, Hoc Vray...
Đào tạo 3d max Vray - Sketchup - Rhino - Mega3d.vn tại HCM - Ths.KTS Nguyên Vũ 0905 466 238: 20. TUT VẼ ĐÔN GHẾ TRONG 5' / Học 3DSMAX, Hoc Vray...: Viết bởi daotaohoavien.com Vào lúc 29 Tháng 3 2014 Nhãn: Dựng hình, dựng đôn ghế, học 3d, học 3d cơ bản, Model, model 3d max, model ghế, mo...
Đào tạo 3d max Vray - Sketchup - Rhino - Mega3d.vn tại HCM - Ths.KTS Nguyên Vũ 0905 466 238: Khóa 3d Max Vray Cơ bản - Bài 2 Extended Primitrie...
Đào tạo 3d max Vray - Sketchup - Rhino - Mega3d.vn tại HCM - Ths.KTS Nguyên Vũ 0905 466 238: Khóa 3d Max Vray Cơ bản - Bài 2 Extended Primitrie...: Khóa 3d Max Vray Cơ bản - Bài 2 Extended Primitries - Trục tuyệt đối Bài 2: Các phương pháp dựng hình trong trục tương đối và trục tuyệt đối...
Đào tạo 3d max Vray - Sketchup - Rhino - Mega3d.vn tại HCM - Ths.KTS Nguyên Vũ 0905 466 238: Khóa 3d Max Vray Cơ bản - Bài 4 Spline - Extrude -...
Đào tạo 3d max Vray - Sketchup - Rhino - Mega3d.vn tại HCM - Ths.KTS Nguyên Vũ 0905 466 238: Khóa 3d Max Vray Cơ bản - Bài 4 Spline - Extrude -...: Khóa 3d Max Vray Cơ bản - Bài 4: SPLINE. HÀM BIẾN HÌNH BEVEL BÀI 4: PHÉP CHỈNH CẤP ĐƯỜNG CỦA SPLINE. HÀM BIẾN HÌNH BEVEL. Hiệu chỉnh cấp đườ...
Đào tạo 3d max Vray - Sketchup - Rhino - Mega3d.vn tại HCM - Ths.KTS Nguyên Vũ 0905 466 238: 29. HƯỚNG DẪN TẠO MÂY VỚI VRAY ENVIRONMENT FOG / H...
Đào tạo 3d max Vray - Sketchup - Rhino - Mega3d.vn tại HCM - Ths.KTS Nguyên Vũ 0905 466 238: 29. HƯỚNG DẪN TẠO MÂY VỚI VRAY ENVIRONMENT FOG / H...: Một trong những tính năng thú vị nhất của bản Vray 1.5 SP3 là VrayEnvironmentFog (VEF).Nó tương tự như một hệ thống tạo fog đơn giản tron...
Đào tạo 3d max Vray - Sketchup - Rhino - Mega3d.vn tại HCM - Ths.KTS Nguyên Vũ 0905 466 238: Khóa 3d Max Vray Cơ bản - Bài 3 Boolean, Taper, Be...
Đào tạo 3d max Vray - Sketchup - Rhino - Mega3d.vn tại HCM - Ths.KTS Nguyên Vũ 0905 466 238: Khóa 3d Max Vray Cơ bản - Bài 3 Boolean, Taper, Be...: Khóa 3d Max Vray Cơ bản - Bài 3 Bài 3: Xây dựng phép biến hình vật thể Pro Boolean, Deformers. Hiệu chỉnh Các đường Spline trong tạo hình. ...
Thứ Bảy, 21 tháng 3, 2015
Thứ Ba, 10 tháng 2, 2015
40+ Excellent 3D Studio Max Tutorials
1. How to Make a Dazzling Golden Pearl Teapot
With this tutorial, all the designers easily create stunning Golden Pearl Teapot in 3D Studio Max.

2. Creating a Cup of Coffee
With this tutorial you can easily and quickly create a cup of coffee in 3Ds Max.

3. Making Of Steam-Powered Factory
In this tutorial, you will learn how to create the model of Steam-powered Factory in 3Ds Max.

4. How to Model a Digital Photo Frame
This tutorial covered the whole process of how you can create a Digital Photo Frame in 3Ds Max.

5. How to model a HTC Tattoo, Android phone
You can easily create an Android phone and the HTC Tattoo model in 3Ds Max and VRay with this tutorial.

6. Making of Ayasha
If you want to create a 3D cartoon character “Ayasha in 3Ds Max then you should use this tutorial.

7. Modeling a Table
Those who are beginners in 3D studio max this tutorial will help them. In this we showcasing Brancusi table.

8. Create a Windows-Like Logo
If you want to generate a Windows like logo then, you should see this tutorial.

9. Furniture Modeling
This tutorial gives you some basic ideas when you are modeling an organic, upholstered piece of furniture.

10. How to model a Table and a Chair
You can easily generate model of a table and a chair with 3Ds max through this tutorial. In this tutorial you can also download some sample link in .max, .3ds, .obj formats.

11. Making of Dead Twice
This tutorial will help you to learn how to make Dead Twice you can also see in this tutorial the procedure of the modeling, mapping and texturing.

12. Creating a Next-Gen Video Game Hot Rod: the Complete Workflow
This tutorial is treat for all those people who really want to learn how to create a high quality, Next-Gen, normal mapped Hot Rod for immediate use.

13. The Soviet Machine
With this tutorial, both beginners and intermediate 3ds Max users easily creates Soviet Machine.

14. Creating Bicycle Model in 3DS MAX
Through this tutorial, you will generate a model of Bicycle in 3Ds Max and this tutorial, we will also show you how to manipulate turbo smooth modifier.

15. How to model an Iphone 4 with 3ds Max
In this tutorial, designers will learn how to create a model of an iPhone 4 with 3Ds Max. Enjoy this amazing tutorial everyone!!!

16. Create a Wooden Toy Car
Those designers who want to generate stunning Wooden Toy Car in 3Ds Max then this tutorial will prove to be the best.

17. How to Create a Car using the Polygonal Modelling
This tutorial is the treat for those people who don’t know the basic steps of how to create a car by using the polygonal modeling process.

18. Clock Tutorial
With this tutorial, designers will learn how to create Clock in 3DS Max and how to work with the tone mapping and layer blending controls. This tutorial will show you that how to build light setup.

19. Making of Realistic Kitchen
With this tutorial, you can easily make a classic kitchen in 3Ds Max start with component modeling through applying textures and ending with lighting and Vray setup.

20. Animating Wall-E Style LED Eyes In 3D Studio Max & After Effects
This tutorial will help you to make Animating Wall-E Style LED Eyes in 3Ds Max and after effect. This tutorial will provide you the complete details which are required for this process.

21. How to model Bathroom furniture with 3DS Max
With this tutorial, you can create model Bathroom furniture in 3Ds Max also with this tutorial you can learn how to generate basic room with illumination.

22. Making of Sanlik
If you want to create the character called “Sanlik” in 3Ds Max then this tutorial will provide you complete information for this process.

23. Making of cafe by Tiziano Fioriti
With this tutorial, you can easily generate amazing model of Cafe Table.

24. Making of Quad Bike
In this tutorial, you will learn how to create model of Quad Bike.

25. How to Model a USB Memory Stick with 3ds Max
Through this tutorial, you will learn how to create a model of a USB Memory Stick in 3Ds Max and this tutorial will also help you to create some necessary materials and studio render.

26. High Poly Weapon Creation: Modeling the AK-47
With this tutorial you can create a high poly, realistic AK-47 in 3D Studio Max. In this tutorial you will see some different poly modeling techniques and tools to create this very cool and detailed model.

27. Interior Lighting with 3DS Max Standard Lights
This tutorial will help you to generate Interior Lighting with 3DS Max Standard Lights.

28. Making of Nigeria National Theatre
For those people how want to create Nigeria National Theatre in 3D studio Max then for those people this tutorial will be a treat so, enjoy.

29. Forest Pack Tutorial: Modern Barn
This tutorial is packed with complete features of Forest Pack which are required to create the Modern Barn scene.

30. Modeling Classic Table
With this tutorial, you can generate a stunning and amazing Wooden Table with 3Ds Max.

31. Modeling a Volk rim in 3DS Max
Through this tutorial you will learn how to make a Volk racing wheel in 3DS Max 2012.

32. Creating 3D Logos In 3D Studio Max
If you want to create stunning 3D Logos with 3Ds Studio Max then this tutorial is best for this purpose. This tutorial will give you all important techniques that can be applied to logos, text or any other shape your project requires!

33. Making of a Victorian Building
If you want to create a Victorian Building in 3DS max with the help of Photoshop and Vray then this tutorial will help you and prove to be the best.

34. Modeling a Faucet
This tutorial is packed with the box modeling techniques which help you to build up a Faucet object in Autodesk 3ds Max 2012.

35. Making Of ‘The Lantern’
This tutorial will teach you each step of creating the image called Lantern in 3Ds max.

36. Model a Stylish Eames Lounge Chair In 3ds Max
With this tutorial, you will easily and quickly create model a Stylish Eames Lounge Chair In 3ds Max.

37. Making Of ‘Cais das Artes (Quay of Arts)’
If you want to create ‘Cais das Artes (Quay of Arts)’ then this tutorial will teach you.

38. Compositing in Nuke
This tutorial will show you the rendering layers of objects and compositing in Nuke.

39. Making Of Brave New World
With this tutorial, you can make the textures for the Brave New World image as well as shader breakdown.

40. Car modeling – BMW Z4
By using this tutorial you will able to create a BMW car model in 3d Max.

41. Creating The iPhone 4S In 3D Studio Max
In this tutorial you will see the necessary poly modeling techniques which are very helpful in creating the iPhone 4S in 3d Studio Max.

42. Model A Decorative, High Poly Chandelier
With this tutorial, you will create model a decorative chandelier in 3D Studio Max using basic tools and poly modeling techniques.

43. Create A High Poly Steampunk Guitar
This tutorial will teach you that how you can create an attractive high poly steampunk guitar in 3D Studio Max.

44. Lighting & Rendering in 3dsmax using mental ray
This tutorial will show you that how you can use lighting & rendering in 3Ds Max.

45. Creating a Low Poly City in 3ds Max
With this tutorial, you can make a Low Poly City With 3Ds Max, Photoshop and with a superb free plugin called Greeble.

Realistically Light and Render Interior Scenes using 3ds Max and Vray

Discover the secrets behind properly lighting and rendering interior scenes with 3ds Max and Vray in this easy to follow, step by step walkthrough. Scene setup, modeling, texturing, lighting, and rendering for realistic output will all be discussed, so there is literally something in here for everyone!
Additional Files/ Plugins:
Step 1
In this tutorial, we’ll be using real units, so the first thing would be to open the menu "Customize > Units Setup > US" and choose "Standard > Feet w/Decimal Inches" as the unit.

Step 2
When you are trying to get a photorealistic quality it is very important to make sure that your object scale is accurate. This will play an important role in achieving a good render. Also, as you can see the scene is quite simple... just a small lobby (mostly modeled with boxes). Note: It is important that it is a closed room, and there are no openings for the light from environment to enter.

Step 3
Press f10, and from the "assign renderer" tab choose "Vray". This will enable "Vray" as your renderer, and also enable Vray materials in your material editor.

Step 4
Assign a simple Vray material to all the objects in the scene, and set up basic scene lighting and render settings. This is to finalize the lighting and render settings and save time, since a plain material renders much faster than reflective and glossy materials which will be added later.

Step 5
Now to work on the lighting and render settings to achieve the final result.
Step 6
Add a Vray physical camera to the scene by going to "Create Tab > Camera > Vray > Physical Camera".

Step 7
The settings for a physical camera are:
- Type - Determines the type of the camera. Set it to "Still".
- Film Gate - Specifies the horizontal size of the film gate in millimeters. Set it according to your scene.
- Focal Length - Specifies the equivalent focal length of the camera lens.
- f-number - The width of the camera aperture and (indirectly) exposure. If the Exposure option is checked, changing the f-number will affect the image brightness.
- Vignetting - When this option is on, the optical vignetting effect of a real-world cameras is simulated.
- White Balance - Allows additional modification of the image output according to the color or preset chosen.
- Shutter Speed - The shutter speed (in inverse seconds) for the still photographic camera. For example, a shutter speed of 1/50 s corresponds to a value of 50 for this parameter.
- Film Speed (ISO) - Determines the film power (sensitivity). Smaller values make the image darker, while larger values make it brighter.

Step 8
Now to place the various Vray lights. Lights 1-4 affect the scene directly, whereas light 5 has been placed in a downward direction, and will affect the scene in an indirect (in the
form of bounced light).
form of bounced light).

Step 9
The basic parameters of the Vray lights are:
- Color - The color of the light.
- Multiplier - The multiplier for the light color. This is also the light intensity determined by the Intensity units parameter.
- Invisible - This setting controls whether the shape of the VRay light source is visible in the render result. When this option is turned off the source is rendered in the current light color. Otherwise it is not visible in the scene.
- Subdivs - Defines the samples, or the quality of the light. 8-10 should be used for test renders, and 15-20 for final renders. Increasing the samples will significantly increase your render time.

Step 10
IES stands for "Illuminating Engineering Society". The photometric data is stored in these files. A photometric web is a 3D representation of the light intensity distribution of a light source. Web definitions are stored in files. Many lighting manufacturers provide web files that model their products, and these are often available on the Internet. We as artists can use them to replicate the real life phenomena of light in 3d.
Go to the "Lights" tab, choose "Vray" from the drop down list, and create a "Vray ies" in the right view. Then instance it below all four steel holders.


Step 11
The main settings for the ies lights are:
- Browse Button - Click it and browse for the ies file that you want to use.
- Color Mode - If you choose this option, you can change and affect the light intensity through the color picker.
- Temperature Mode - Allows you to accurately change the light intensity through the color temperature.
- Power - Determines how bright the light will be.

Step 12
Through the following steps, you will configure the rendering settings in Vray. Press F10, then under "Global Switches", uncheck "Default Lights". This will cause the default lights in the scene to be switched off. For the Image Sampler type select "Adaptive DMC", and "Catmull Rom" as the filter. Also, change the min and max subdivs as shown.
Lastly, change the "Color Mapping" type to "Exponential". This mode will saturate the colors based on their brightness, and therefore, will not clip bright colors, but saturate them instead. This can be useful to prevent Burn-outs in the very bright areas (for example around light sources etc).

Step 13
Under the "Indirect Illumination" select "Irradiance Map" and use "Light Cache" as the primary and secondary engine. Also, change the Preset to "High", "hsph subdivs" to 50, and "interp samples" to 20.
- Irradiance Map - Computes the indirect illumination only at some points in the scene, and interpolates for the rest of the points. The Irradiance Map is very fast compared to direct computation, especially for scenes with large flat areas.
- Current Preset - Allows you to choose from several presets for some of the irradiance map parameters.
- Hemispheric Subdivs (HSph. subdivs) - Controls the quality of individual GI samples. Smaller values makes things faster, but may produce blotchy results. Higher values produce smoother images.

Step 14
With a Light Cache, the light map is built by tracing many eye paths from the camera. Each of the bounces in the path stores the illumination from the rest of the path into a 3d structure (very similar to the photon map). In the Light Cache put 1500 for subdivs and 8 for no of passes.
The Subdivs determines how many paths are traced from the camera. The actual number of paths is the square of the subdivs (the default 1000 subdivs mean that 1 000 000 paths will be traced from the camera).

Step 15
Your settings for the test render are done. If you hit render now, you should see the same image that was shown before. Now all you need to do is apply the materials, and increase the Irradiance Map and Light Cache samples for the final render.

Step 16
Now to texture the scene (actually it's quite simple). The basic parameters that will be used in materials are:
- Diffuse - The diffuse color of the material.
- Roughness - Can be used to simulate rough surfaces or surfaces covered with dust.
- Reflect - The reflection color.
- Reflection Glossiness - Controls the sharpness of the reflections. A value of 1.0 means perfect mirror-like reflections; lower values produce blurry or glossy reflections. Use the Subdivs parameter below to control the quality of the glossy reflections.
The shader for the tiles on the base is a simple vray material with a de-saturated texture in the diffuse and a noise map in bump.

Step 17
The wood rack is also made of a Vray material with slight reflections and glossiness.

Step 18
The material for the wall is again just simple cream and black colors with no reflections.


Step 19
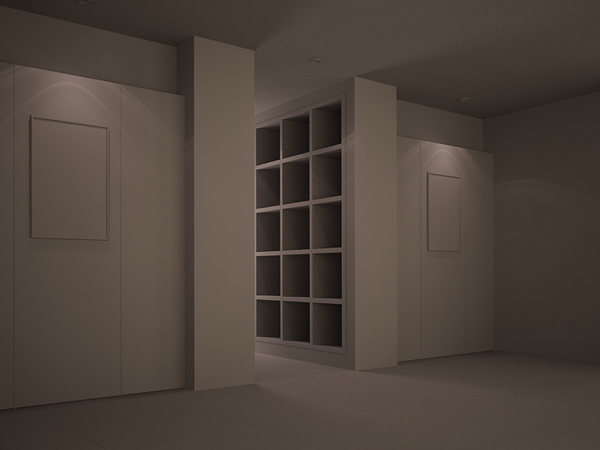
The shader on the wall on which the paintings are hanging is made of steel and white wall. The wall part also has a grainy texture assigned to it.


Step 20
Your scene is now textured! You can add any other props or objects you like to fill up the scene. The above rendering settings are good for test renders, but for production quality you will need to increase the samples for the image sampler, Light Cache, and Irradiance map.

Step 21
Here is the final result! Hope you learned something new!!.
http://cgi.tutsplus.com/tutorials/realistically-light-and-render-interior-scenes-using-3ds-max-and-vray--cg-2266
Đăng ký:
Nhận xét (Atom)